
Here at KegWorks, we're passionate about all things related to beer. We like to talk about it, write about it, think about it, drink it, and perhaps most of all, brew it! We know that many of you out there have thought about starting an all-grain homebrew batch of your own, but we also understand that sometimes it's a little bit intimidating to make that leap from extract brewing to all-grain. But you know what? We're here to help!
This blog post is the first in a series from KegWorks Senior Print Designer, Collin Corcoran. Collin joined the KegWorks team about two years ago without ever having brewed in his life. But the further he got involved with the infectious beer-centric energy in our office , the more his interest in home brewing began to be piqued. And, to be frank, Collin isn't a guy who moves slowly, so when it was finally time to pull the trigger and brew a batch of his own, he jumped right into the all-grain experience.
Over the course of this blog series ("Homebrew 101: Brewing Your First Batch"), Collin will discuss the steps of his process. He'll talk about the equipment and ingredients, the brewing and bottling, and, finally, discuss the results of the finished product. We're confident you'll enjoy this glimpse into the life of a beginning all-grain brewer. As you're reading, feel free to comment on the post or shoot us a message at Facebook. We'll make sure that Collin sees your comments and he'll be happy to answer any questions as well.
Alright, without further ado, let's get going. Today's post is all about building yourself a mash tun, an essential piece of equipment for all-grain brewing. Here we go:
To brew all-grain you need to buy or build yourself a mash tun. This is basically a water cooler or chest cooler that you convert into a vessel to soak your grains in order to extract the most fermentable sugar possible. For your convenience, KegWorks offers a pre-assembled 10-Gallon Mash Tun, but for those of you who are DIYers, the rest of this blog post will talk about building your own.
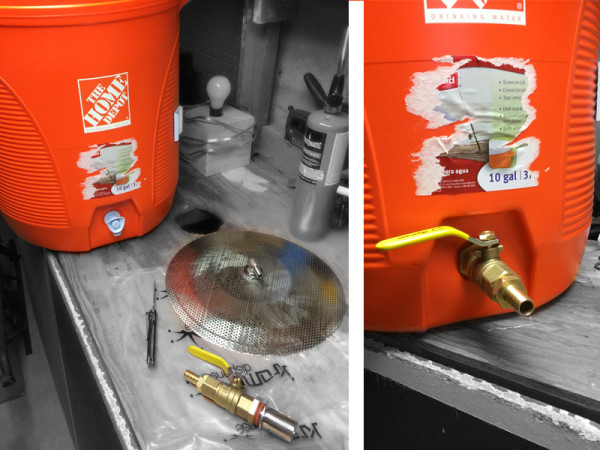
I bought a cylindrical water cooler from my local Home Depot, and the No Weld Homebrew Kettle Valve Conversion Kit, a Stainless Steel False Bottom, 3/8" Inside Diameter Vinyl Beer Line Tubing, and two Screw Clamps from KegWorks. With a crescent wrench, a little bit of plumbers tape, and this equipment, I put together a simple mash tun in no time flat.
The first step was putting on the brass homebrew valve, which is as simple as removing the plastic valve stem that comes with the cooler, and putting the new brass valve into the hole before tightening the nut and rubber seal inside the tank.

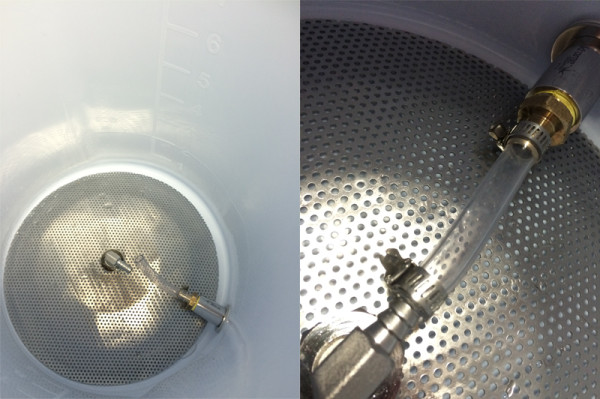
Next, set your Stainless Steel False Bottom in the cooler with the spout facing upwards then cut a small piece of 3/8" Inside Diameter Vinyl Beer Line Tubing to size. I just eye-balled it, the piece has to be small enough to fit over the barb on the valve and false-bottom. Then just tighten down your stainless steel adjustable clamps over the tubing until it’s nice and snug with a flat-head screwdriver. Be sure not to over tighten, because to don’t want to crush the brass barb inside.

Keep in mind that when you steep your grains inside this mash tun, the water will trickle down through the false bottom and flow out this vinyl tube, so it will have to pass through all of these brass components. It’s wise to have the pathway completely unobstructed so that you get the best flow possible when draining your wort. After everything is assembled, fill it up with water to make sure there aren’t any leaks. You could use a piece of metal tubing for this false-bottom but I chose the vinyl tubing because I like to clean out the whole system every couple of batches and replace the tubing, just to make sure nothing is ever stuck in there.
That’s it! Now you can effectively mash your grains with a few KegWorks products and a little elbow grease. Tune in next week when we post the next blog in the Homebrew 101: Brewing Your First Batch series. It's going to focus on making your own yeast starter, or in other words, you're not going to want to miss it!


Leave a Comment